
TORTIE PRINT TUTORIAL
TORTOISE PRINT NAILS - IT'S TUTORIAL TIME 💅
Hey everyone! Happy Wednesday 💗 welcome back to Nail Tech Talk with me, Frey :) This week I am bringing you a tutorial for the trend of the season - tortie print nails 🤎

I want to make this super simple for everyone to try out so I am going to break it down to a step by step...
First of all, here's a list of all the products that I use:
- A range of gel polish shades, I use; Golden Hour, Truffle, Espresso Yourself & Blackout (all from The Manicure Company)
- Base Coat
- Top Coat
- Blooming Gel (if you don't have this, you can use base coat instead but it may nt give he exact same effect)
- Nail art palette
- Stripe Liner nail art brush (from TMC)
- Dotting tool
Once you have grabbed all of these bits then you're ready to paint!
STEP 1:
Mix up the shades 'Golden Hour' and 'Truffle' with a base coat to get a glassy browny yellow shade. This color looks kind of disgusting but trust the process!! 😆 Paint this 'strange' shade all over the nail then cure in your nail lamp for 60 seconds,
STEP 2:

Add a coat of blooming gel to the nail and do not cure this layer!
STEP 3:

Pick up some of the shade 'Espresso Yourself' on your liner brush and start blobbing dots all over the nail into the uncured layer of blooming gel. This doesn't have to be perfect, you can use a dotting tool either. You can make them as rigid or as splotchy as you'd like.
STEP 4:

Keeping adding brown until you achieve your desired look. Let the blooming gel work its magic and allow the brown to spread. Once you are happy, cure in the lamp for 60 seconds.
TOP TIP: don't use too much product, you can always add more if needed but it starts getting messy when you have to take product away.

Once the brown is cured you can add another layer of blooming gel. Once again, do not cure this! Start adding dots of 'Blackout' gel polish to the centre of the brown dots and let the black gel spread over the brown. Make the black blobs slightly smaller than the brown ones do that the black does not take over. This does not need to be rigid either, add as much or as little as you'd prefer.
STEP 6:

Once you are happy with the black additions to the design you can cure it in the lamp for 60 seconds. if the design is a bit bulky after the final cure from all of the layers, take a lint free wipe and some alcohol and wipe the design. Give it a gentle buff using 100/180 grit foam file/ buffing block.
STEP 7:

Add a non wipe top coat to the design and cure for 60 seconds aaaand BOOM you are all done! 💫
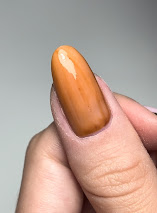
THE FINISHED LOOK:

Have fun with this tutorial and experiment with it, that's what I did here!
Hope you enjoyed this step by step, if you have any questions let me know in the comments below ▼
Thanks for reading!!! 💖


This print is so cute! Will defo use for inspo on future sets x
ReplyDelete